This article is part of a series of Hints and Tips to help you apply for the StateoftheART Gallery Award. The Award is an online platform and accessible opportunity that allows artist submissions to be made using a mobile phone, and the application is completely free of charge.
We have outlined below some common types of artworks and guidelines for how to get the best photos possible. This guide will be based on you only having access to a smartphone (a mobile phone with a digital camera and access to the internet). After taking your photos, we outline how to edit them using the mobile app Snapseed, and save them - ready to upload.
If you do have a Digital camera available, some of the suggestions could still help you out, and you could use the advice below when editing your photos on your desktop computer - or send the images to your phone to edit using the app.
Artwork pictured: 'Isn't it Lovely All Alone' by Danielle Hewlett
Firstly, regardless of your artwork medium, the aim is to take photos that closely resemble the artwork in real life. This means the colour, brightness, texture and proportions should all look as close to real life as possible.
For the Gallery Award, we ask that you submit 3 photos: 1 of the artwork straight on, 1 side angle and 1 detail close-up. These three photos together provide a lot of information about what the artwork looks like ‘in the flesh’.
These steps outlined below can be seen as a general guide and tips to bear in mind, but the process of photographing artwork is very different for every art piece, style and medium. It is important to experiment and find what works best for your artwork.
Before you start:
First, go look at the Camera settings on your phone and check the resolution and size options of your images.
It helps to know what your camera can do and also to make sure you don’t take very high resolution images if they are not needed and result in large file sizes and slow upload speed.
For the Gallery Award we require that JPEGS must be sized at 2000 pixels on the longest side, so choose the option that is closest to this.
Photographing your Artwork
Painting or Mixed Media on Board or Canvas:
1. Find a space to photograph, either inside or outside, with very even natural light. No harsh sunlight or shadows, and away from any warm lamps or overhead lights. Sometimes it is best to wait until it is an overcast day outside - as the cloud cover will act as a diffuser and ensure no harsh sunlight. Make sure there are no shadows from objects around you, or caused by you standing in front of the artwork. Ensure that the artwork has a good even spread of light all over it, no darker patches or bright spots.
2. Place your artwork either standing up; leaning against a wall or secure object; or hanging flat against a wall. Make sure you have enough space to fit it all in the image and so you can move around it to see the sides and edges.
3. If you have a tripod and can use it with your digital camera, this is the time to use it! Otherwise, find a position where you can hold your phone camera as still as possible - sit, rest, or lean against a chair, hold your elbows close against your body, or use a table to prop your phone on. To avoid blur and shake, try taking a deep breath and releasing it before taking the picture.
4. Open your camera app on your phone and line up the artwork in your camera frame: position the camera so it faces the artwork head-on. You can look at the sides of the artworks and make sure they are in line with edges of image. The artwork should fill as much of the image on your screen as possible, but make sure you can see all of the edges.
5. Check your Camera settings and make sure the flash is turned off and you are in ‘Photo’ mode. If you have the option on your phone (and you feel confident using it) you can also use 'Pro' or 'Manual' mode.
6. Make sure to get the artwork in focus. On most phones, tapping on the screen in the middle of the artwork image will make the artwork in focus. Try to keep very still (breathe out!) and don’t let your finger cover the camera. Tapping on the screen will sometimes also adjust the exposure of the image (how dark or light it is). If your image looks too dark or too light, some smartphones have the option to drag the exposure up or down - try tapping, holding and then sliding your finger in the directions of the arrows and experiment with how it makes you image look.
7. Take a few photos head on (more for safety), as well as from the side - showing the edges of the artwork.
8. To take a detail image, get your phone camera as close as possible to the artwork (without casting any shadows on it!) and make sure it is in focus. Sometimes it helps to take this image slightly from the side too, to show the texture of the surface, but not too much - it should still look like the artwork.
9. Double check your photos, zoom in and make sure they are in focus. Make sure you are happy that the photos are as close as possible in colour to the original artwork in front of you.
Artwork pictured: 'Fun Day: St Francis Beach' by Alex Marmarellis
Artwork on paper:
1. Follow step 1 as above, but find a method to hang your paper work up - so you can face it head-on. This could be clipped to a board, or hung from a line. Ensure that the artwork has a good even spread of light all over it, no darker patches or bright spots. If this is not possible, you can try lying your artwork flat on the ground or on a table and taking a photo from above. Make sure you have enough even light so you do not cast a shadow.
2. Try to keep your artwork on paper as flat as possible - warping, folds or curves in the paper will make shadows and result in a bad photo. Use clips or weights to ensure it hangs or lies flat.
Follow steps 3 - 9 as above.
When taking a side angle photo, make sure to show the edge of the paper - the texture is important.
If your paper medium is white or cream coloured, make sure that the finished image is the same colour. The biggest mistake artists make when photographing their works on paper is letting the background paper colour become grey (too dark and shadows) or orange (from nearby lamps).
3D / sculptural work:
1. Follow all the above guidelines as appropriate, but make sure that your background is very plain, clean and does not distract from your artwork. Use a large sheet of paper or cloth if needed, or a blank wall or shelf.
2. Take a photo from the ‘front’ of the sculpture, one from the side - showing the depth - and one image showing the texture and details.
Artwork pictured: 'The Warhol Affects' by Jonathan van der Walt
A note on Artworks Framed behind Glass:
The best way to photograph artworks framed behind glass is to photograph them BEFORE they are framed with glass over them. Always make sure you get a photo of your artwork unframed before you send it to the framer. Even if you will need to take another one with the frame, at least you have a clean image without any reflections.
For the StateoftheART Gallery Award, we recommend you DO NOT FRAME your artwork, and if you are selected as a Finalist consult the Gallery first before framing. If the work is already framed, please make sure the artwork images you submit show the framing clearly, including the side image.
If you HAVE to photograph your artwork with glass over it, there are a number of tricks you could use, but this depends on the size of your artwork, the colour (light or dark backgrounds will reflect differently) and what you have at your disposal.
Experiment and find the best solution for you:
Trick #1: Stand the framed work up in a space with even light over it, and hang an opaque cloth or prop a board in front of it, with a small hole cut into it, big enough for your camera’s lens to see through. This way you are blocking out all reflections except the tiny hole of the camera.
Trick #2 : Take the photo of the artwork at a slight angle, so you avoid seeing any reflections. Then edit the photo’s Perspective in a photo editing app to straighten the sides and correct the artwork. This is a very tricky option, as the artwork could become very warped and incorrect if you get it wrong.
Trick #3 : Lie the framed artwork on the ground or a table, so it faces the ceiling (no lights directly above), and take the photo from a slight angle to avoid your own reflection. Use a photo editing app to adjust the photo’s Perspective and straighten the sides to correct the artwork.
Editing your Photos
The next step is editing your photos. Do not rely too heavily on this step, as your main goal should be to take well lit, clear and in focus photographs in the beginning. The only thing that should be needed is small tweaks and cropping of your images.
There is a multitude of apps you can download and use to edit your photos, or you could edit using your phone's built-in editor. See a list of recommended apps below, or search in your App Store. The best approach is to try different apps and decide on the best one for you.
Recommended Apps to edit photos on your phone:
The App that we recommend you use is Snapseed.
Snapseed is completely free and made by Google, so usually works very well on Android devices. It offers a huge amount of editing capability and is very easy to use. It also lets you save, export or share your photos simply.
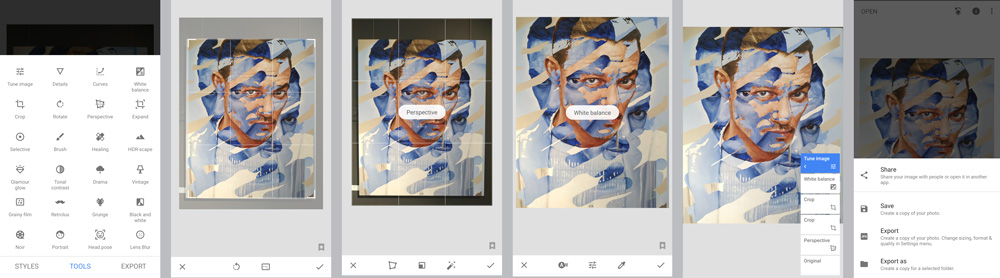
How to edit your Artwork image with Snapseed
The features you will be using the most in Snapseed are: 'Tune Image', 'White Balance','Crop' and 'Perspective'.
Adjusting the colour:
Firstly, if you need to edit the colours of your artwork image because your photograph did not capture them accurately, use the 'Tune Image' tool to adjust. Swipe up and down on your image to select the tool, and left or right to make the adjustment. You’ll see the setting value at the top of the screen.
Brightness: Darken or brighten the entire image.
Contrast: Increase or decrease the difference between the dark and bright areas.
Saturation: Make the colors more or less vibrant.
Ambiance: Adjust color saturation and contrast at the same time.
Shadows: Darken or lighten only the shadows (dark areas) in your image.
Highlights: Darken or lighten only the highlights (bright areas) in your photo.
Warmth: Add a warm orange or cool blue color cast to your image.
Secondly, if you unfortunately captured some outside light in your image and your artwork looks the wrong colours, use the 'White Balance' tool to adjust. You shouldn't ever need to adjust it too much - rather take another photo in better light.
Temperature: Make the colors in your photo cooler (more blue) or warmer (more orange).
Tint: Add a green or pink color tint to your image. (This helps if you had to take an image under fluorescent lights - sometimes it create a strong green tinge that is difficult to remove without using 'Tint' and adding a little bit more pink to the image.)
Artwork pictured: 'Ternion III' by Corné Eksteen.
A great thing about Snapseed is that it uses non-destructive editing. That means you can delete or modify any individual edit at any point in the future.
Tap the Edit History icon (square with a curved arrow) at the top of the screen. Then tap View Edits in the menu.
Use the Trash icon to delete that edit from your photo. Tap the Sliders icon to modify the edit. This opens up the editing tool where you can change the settings you originally applied.
Straightening and Cropping your Artwork Image:
When taking your photograph you need to try to face the artwork straight on, so the artwork's edges appear straight. If however this doesn't work, or you need to avoid reflections by taking the photo at an angle, you will need to use the '
Perspective' tool to correct your image.
Select '
Perspective' and choose the
Tilt option. Use the grid lines that appear to correct the edges of your artwork, so both vertically and horizontally they look straight.
To correct the vertical perspective, drag down over your photo until the lines become parallel. To correct horizontal perspective, drag left or right. Sometime you will need to use the '
Free' option to adjust the edges of your artwork. Experiment and find what works best for your artwork. Remember you can 'Undo' or go back and delete your edits at any time if you make a mistake.
After adjusting the Perspective and making your artwork perfectly straight, you will need to crop the image in.
The '
Crop' tool lets you cut away the edges of your image. This is essential when photographing your artwork, to remove the background and edges, and end up with a photograph that only shows your artwork.
Select the '
Crop' tool and choose '
Free' to be able to crop without set dimensions (so you can adjust it to the size and dimensions of your unique artwork).
Drag the corner handles to adjust the crop position. Tap the tick to complete the edit.
Saving and Exporting your Image
When you have completed your editing, tap on the three dots on the top right of the Snapseed app and select '
Settings'. Now you can adjust the Exporting and Sharing options and choose the maximum Image size for saving your photo. Remember that the Gallery Award requires images of a maximum 2000px. You can also choose the format (JPEG) and quality.
Then return to your edited image and tap '
Export' and 'Export' again to save it with the Settings you have chosen.